Showing posts with label reviews. Show all posts

12.3.15

PN Racing Double A-Arm wide front conversion is finally here!

For me personally this has been one of the most anticipated parts for my Mini-Z.

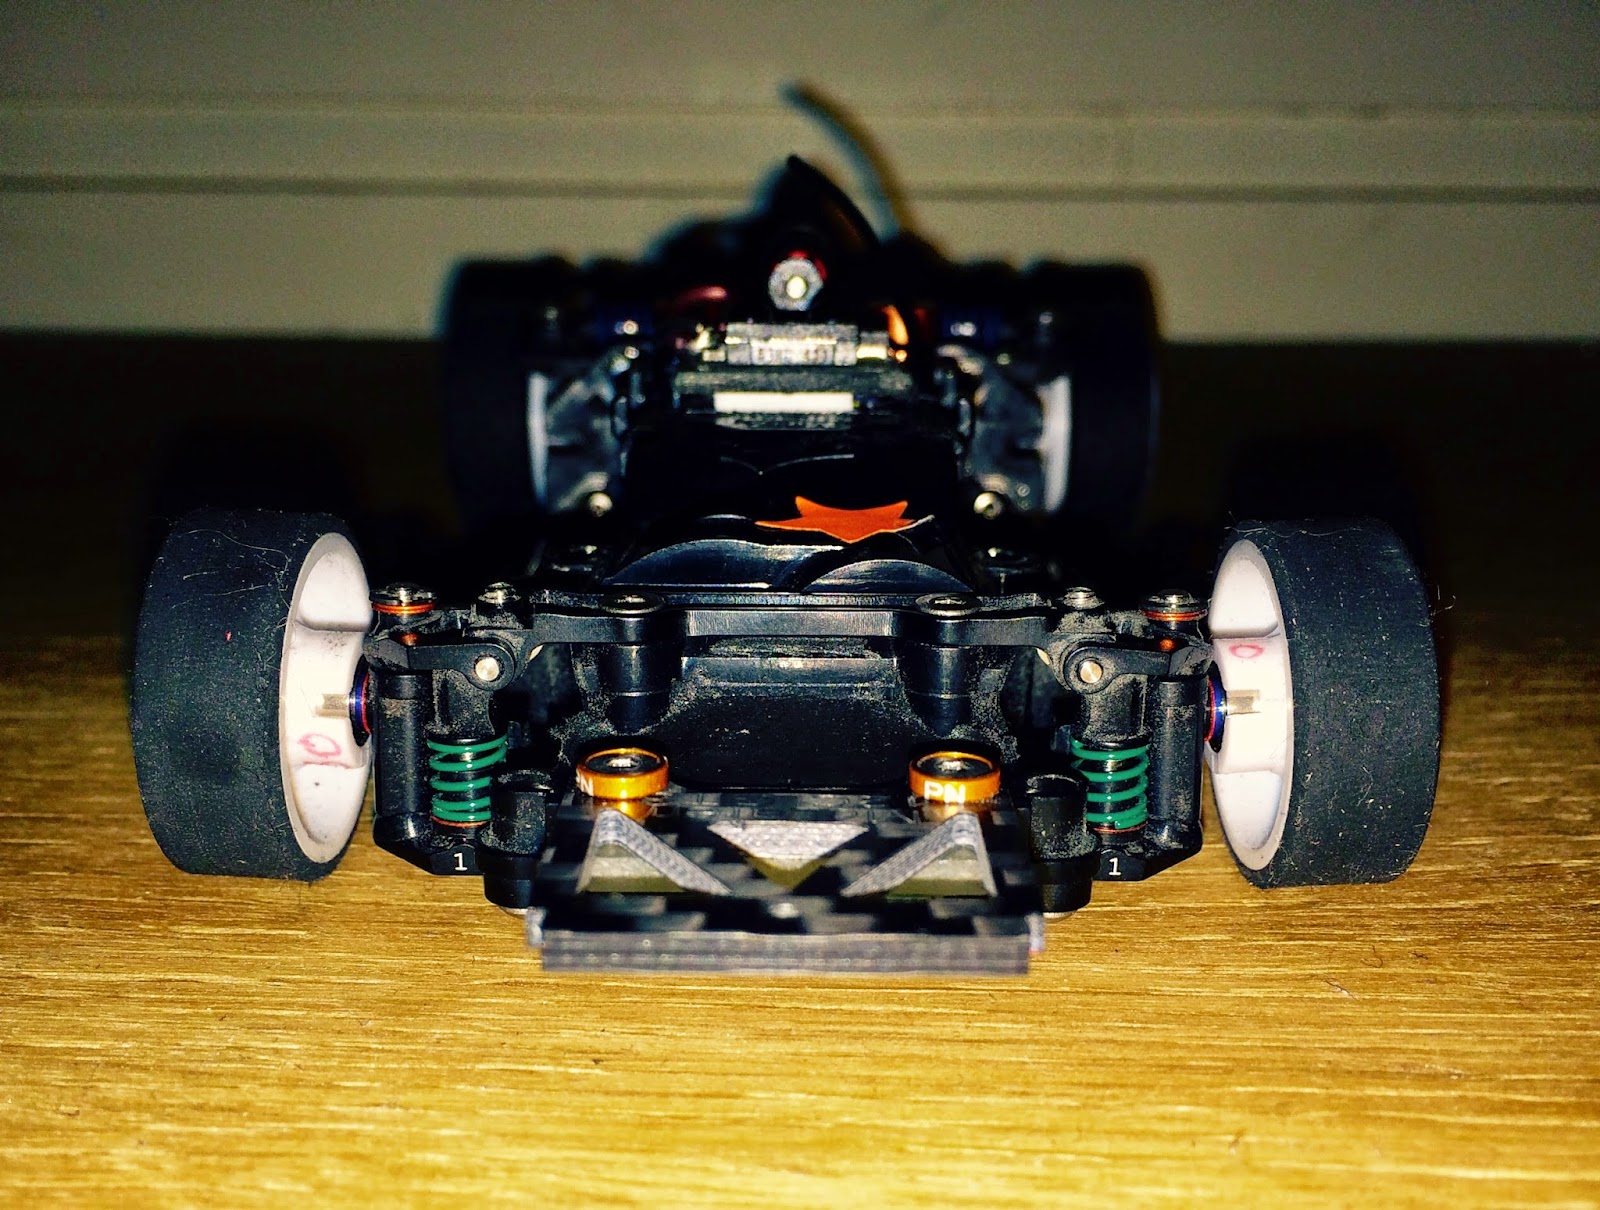
PN Racings double a-arm has for many years set the standard for the Mini-Z front end.
The MR-03 version has been fantastic since its release. When adjusted properly it has next to zero bump steer, lots of steering and stability.
However, for modified racing on high grip, one thing you need is quite large offset rims to get the car wide enough to keep it on its wheels. 2 - 3 offset is the norm.

Regular version. Offset 2,8mm

Wide conversion. Same total with.


Wider offset wheels gives for many people an advantage in that it gives more scrub. With more scrub, the car will brake for you, and the tires heat up more and faster. Many drivers uses this to their advantage,
For other people it is a disadvantage, as they dont like the scrub effect, and like to control their braking and corner speed in other ways.
Driving style differs from driver to driver, so no answer is more correct than the other.

The MR-03 is a great car with fast steering response. But one thing is not that great, and that is the servo strength and also a weak servo saver.
If you look closely at the fast cars at your track, or check out some videos on youtube etc, you can see a usual problem on many cars. In long sweepers and fast corners you can see lots of cars with double steer, The car starts the corner good, holds the line, and suddenly it understeers for a moment before it grips again. This is either caused by a tire that looses grip in the corner, or in many cases that the servo just gives up.¨
See video for example.


The load on the servo increases a lot with bigger offset wheels wich are necessary on the mod cars, and the problem increases with the grip level.

The wide version of the Double A-arm will help a lot in these cases. We have found the cars to hold the lines much better, and this again yelds faster lap times.

Reduced scrub is for me personally a good thing, and I really like the way the car handles.
You have a good selection of tie rods in the kit so you can adjust toe angles to your liking. Good fitment, great quality and a good price for what you get.


Give it a try! Buy it here


11.1.14

Breaking News! P28GT

We have known about this car for some time now, and have had an exemplar inhouse for testing for a couple of months.

The car are similar to the old P28 Pan Car, but some differences are to be found.

  • Black FRP chassis
  • Disk damper setup
  • T-bar
  • Made for regular plastic bodies!
Other than this, it is basically the same car as the P28.

Before testing, we went trough the build of the test car supplied to us.
Everything fits very well together, and the looks of it are great. It just looks mean!

The T-bar is specially made for this car as you can see in the pictures. It is made of carbon fibre, and we got two different hardness bars to test.

The front suspension are the proven sliding kingpin style. This makes setup very easy, and it is race proven. You can use a lot of different springs to make it suit your driving style and grip levels.

The steering setup is smooth. The small servo used here is a Futaba S3114, but other alternatives such as Futaba S3154 can also be used.
It has a very good steering feel, and we can conclude that the guys doing the design has done a good job regarding ackerman settings.

Another trick this car has up its sleeve, are a very very wide front end. This is something we like very much. Going this wide, you can run lower offset wheels and really minimize the scrub. This should give you an advantage over the regular mini-Z type front ends where most people run extreme amounts of scrub.

The chassis plate are as mentioned earlier, made of FRP material. This gives some interesting flex characteristics.

It uses a regular MR-02 or MR-03 card, that most people know and love. We have not tested it with VE electronics, but I am sure this will be a potent combo.

Testing.

Initially the car was a bit twitchy, but after some small setup changes it really came alive.
The grip this car offers is extreme. The flex of the chassis does most likely contribute to this.
We ended up with some small radio adjustments to get the steering feel perfect. -4% on steering curve was all it took to calm it down.

The steering feel is very good, and it really has a precise feel to it.

We tested the car with a lexan pan car body, and also with a Mosler hardbody. The hardbody adds weight, and this helps in calming thinhs down, but a lexan body can be extremely fast on this thing also.

The car are shood with our tracks favorite tires, and they offer extreme grip. On a regular Z, most people struggle a bit with overheating front tires. On this car we are not! This is due to the reduced amount of scrub!

Testing has been done over m
any many hours of driving.
The setup that ended up beeing fastest at our track is as follows:
Soft T-bar
One disk on DPS. Over. Silver Reflex Racing spring
5000WT Kyosho gear diff grease.
Top shock oil: 500 CST
Top shock spring: Kyosho stock
Top shock preload: 1mm
Front spring: PN White MR-02 Lowdown. Preload until 0 droop.
15000 WT grease on king pins.
Toe: 0
Offset front: 1 (Equals 3 offset on a regular Mini-Z)
Offset rear: 3
Additional ballast: 6 grams center of the chassis
PN 33T motor.
Mosler body.


Basically what we can say is. We think this is maybe the fastest option chassis Mini-Z out there.
Things are kept simple but effective.
If you have raced Mini-Z before, you know how to adjust the setup on this thing. It really is intuitive.

So. If you club rules lets you use this type of car, you really should consider this one. Maybe one of the best option chassis out there as we speak.


13.6.13

LeViteZer magnet suspension!

LeViteZer.
You may have seen the videos, if not you can find them at the bottom of the article. But first. Here's my small writeup about this fantastic development.

Mr. Kim Janson, a member of ZRacers Finland, and avid developer has worked on this really cool project for some time.
Magnet controlled front suspension for Kyosho Mini-Z MR-03. 
Sounds cool doesnt it? Not only does it sound cool, but it works as well.


He sent me a production proto sample for testing, and here are my first findings.
The arms shown in the pictures are not anodized, but it gives you a view on what to expect from the official parts.


Built into this system you have anti roll bar effect and springs. 

The LeViteZer are designed so you can use it on different manufacturers option front ends, as long as its based on the regular MR-03 suspension with fixed lower arm.
The product consists of the following parts:
- Upper arms
- Bottom magnet plate
- Magnets in different size and strength

How does it work?
Basically you have two magnets locate in the stock spring position on the MR-03 in the chassis. These are mounted on a plate in opposite direction of each other.
Then you have the upper arm, where two magnets are attached on the end. These two magnets are also in opposite direction of eachother. The lower magnet are opposite of the one mounted in the chassis.

The force of the magnet in the chassis, will push the magnet on the arm away. This creates a magnet "cushion" that again acts like a suspension spring.

Since the magnets on the arms are mounted in opposite of eachother, the assembly will also have anti roll bar effect. When the suspension compresses on one side, the arm goes down, and as soon as the upper magnet on the arm that lowers are inline with the lower magnet on the other arm, it will start to pull it down.

The setup work is quite easy, but the magnets are strong and can give you some headache under assembly ;) I had a magnet missing for a week, until I found it underneath my table attached to a screw.
Installing it is easy, but to get a precise optimal front end you need to work a bit with shims to get it perfect.

I have never driven a Mini-Z before that really feels like its floating around the track. Bumps are absorbed extremely well. Better than any other front end out there.

We have been testing it on the following configurations:
  • Reflex Racing adustable upper tower and reverse king pin..
  • PN Reverse king pin and upper tower.
Some modification of the RR adjustable tower are needed when you are using the big magnets on the arm, but when using the small magnets its plug and play. With the PN upper tower it fits perfectly, but this again limits you a bit on camber/ caster/ roll centre adjustments.

I have tested every single configuration of the magnets, and I am happy to say all of them are within the useable range. (This is very seldom the case when it comes to spring kits)
Hard, soft, more anti roll, less anti roll and so on.

In the pictures shown are my favourite configuration on our biggest track.
Two small magnets on the bottom plate. Small magnets both sides of the LeViteZer arms. PN lower arm, PN reverse King Pins, PN Knuckles and Reflex Racing adjustable upper tower.

This gives almost exactely the same stiffness as the PN double a-arm with the V1/ V2 green springs. A favourite for many drivers.
The most noticeable thing is that since it doesnt have a spring that compresses it will give you a much more linear feel.

It works very good on smooth high traction tracks, and is absolutely superb at the more bumpy tracks around.

The feeling of the car is just amazing. It really has an extremely smooth feel to it.
Most people at our track who has tried the car with this has improved their personal best times. It holds the track record for stock car, and for modified it is currently sitting second. With some more setup work it should be even better.

I will do a followup with more details, pictures of the parts and also some more about setup thinking.


The videos mentioned earlier are a must see!
Enjoy!


28.12.12

RSD damper mount.

Reflex Racing top damper system.
This unit works for both tri damper systems and disc damper systems. It will fit Mini-Z MR-02, MR-03 and MR-03VE.
I am also glad to tell you that this is a true "bolt on system". No grinding or modifications needed.

The install are super easy, and everything are very precise and a perfect match against the RR top chassis plate. No slop at all!

It consists of a aluminium base, that attaches to the top chassis plate, and a carbon damper mount that attaches to the alu base with two screws. Also a lot of hardware included. Springs, screws etc.


The whole assembly are very sturdy. Much much stiffer than the single carbon fiber mounts available.

Most of us are soldering the motor wires to the chassis, and this makes service a bit of work since you have had to desolder the motor cables, or take out the brushes on the motor to split everyting. Goodby to all of this.
Here we have an assembly that are much more service friendly, since the carbon damper mount are screwed on to the alu base.

You may have to work a bit with damper angles if you are using side shocks since the carbon damper plate will be 2mm higher than a regular carbon plate mounted all the way down on the top chassis plate.

Adjusting wheelbase are alsovery easy to do, since you dont touch the base at all. Only the two screws on the carbon plate.
The mount for top shock are threaded, and also has a spacer with perfect height. The distance from front to rear of the top oil shock are perfect this time. Earlier we have had to adjust the length of the shock to get perfect travel and length. Now it is bolt on.

Weight.
This will add around 1 gram of weight compared to the old RR damper mount. So far testing has not showed any more traction rolls. Actually traction roll problems went largely away with the long arms and lower tower bar, but I was a bit afraid of the increased weight on top of the chassis.


23.12.10

Reflex Racing Low profile front suspension

I have been somewhat sceptic about the whole reverse king pin idea. This is mainly because of the added unsprung weight.

It took me a while before I installed the system in one of my cars, but when i finally did, I am happy to report that I have been wrong.


Mounting are very easy, but a bit fiddling are requiered. Spend time making sure everything are absolutely bind free.
Click here for a full installation "how to"
One thing you need to get are a ball end reamer. 4.75mm. I cant praise this tool to much!

The fact that you remove a lot of slop, and have less friction in the front suspension really makes up or the added unsprung weight.
There are much less slop and as a result you get a much more precise car.

As for it beeing low profile, it will give you a lot more room inside your body. You can now use for example the Atomic pan car bodies etc without having to modify them.


Compared to the Extra long king pin suspension, it wont give you a faster car over one lap. Over a race distance however, I feel it gives an advantage.
I have at least shattered my own personal best 3 minute stints :D

Go ahead and rebuild your suspension. I dont think you will regret it.

I have buildt it using the "how to" on Reflexracing.net, but tweaked it a bit to get it to work with the Atomic FS knuckles. These are 0,5mm lower than stock.

Settings are as follows:

Silver springs
Bottom shim (ride height): 0,5mm
Middle shim (camber): 0,5mm
Top shim (preload): 0,3mm
1 degree camber
30000WT K grease


21.8.10

Review. Reflex Racing Tri shock system

I have always liked side damper systems.
When Reflex Racing released their single side damper tube for a few years ago, I have never gone back to the DDS type dampers. For some reason, my cars have always been the fastest and most consistent with this system.

When PN released their side damper system, the PN Tri shock, this was my favourite. Mainly because of the added adjustablity.

Now Reflex Racing has made their improved tri shock system. This is super light weight, and has superb geometry. The side dampers are perfectly aligned in 90 degrees. This makes for a perfect linear motion.


The system consists of the following parts:
  • Friction shocks in plastic
  • Top plate with an all purpose design. Can be used as DDS and TDS
  • Three different pairs of springs. Hard, medium and soft.
  • DDS plates
  • Mounting screws and spacers
You also need:
  • Kyosho oil shock
  • Dampening fluid/ grease

Installation is quite straight forward.
You have to make sure that the side shocks are not binding. A little rubbing with 1000 grit sandpaper on the "pistons" takes care of that.

The side shock spacers are made a little long. These have to be grinded down to make the perfect length.
Take your time on this. Make sure that you grind down one side at the time, and make sure you have them equal.
I chose to make one side 1mm longer than the other. This is to have two options on damper angle. Just switch them around to adjust the angle.

When you have done all four. Grease up the dampers, mount together, and install the Kyosho oil shock.


Even though this is a prototype, the quality are very good.
The parts fits really good together, and the finish of the carbon mounting plate are great.


The weight will be an advantage. I also feel the damper angles etc really helps in improving the feel of the car.
Compared to DDS systems, the TDS systems really makes for a faster car especially in fast direction changes, and I feel it gives overall better steering response.
The lighter weight also gives you an accelleration and decelleration advantage.


Pros:
  • The mounting screws on the side dampers dont interfere with the rear wheels in any way. Even with 0 offset and new rear tires.
  • The top plate and mounting postions of the dampers does not interfere with the motor in any wheelbase.
  • Perfect geometry= linear dampening.
  • Light weight!
Cons (not really):
  • Takes some time to mount together (But when you are ready, it really works!)
  • Routing the motor wires takes a bit of work, but easier than other systems due to the smaller size dampers and position.
  • I would have loved if a body mounting system was included as on the old RR side damper.


12.8.10

Review. Reflex Racing adjustable upper arm mount

It was with great anticipation I opened the package with these mounts.


When I have them here in my hand, I am impressed.The anodizing looks to be of good quality. Everything is smooth and has an even surface.
The fitment of the parts are as always good, and the adjustment tool looks like a Ninja star:-) This will be a good weapon in the pit when you are about to loose an argument.


Since I use Reflex Racing upper arm pins, I had to polish these a bit with "Autosol" metal polish.
After a few spins in my Dremel they were absolutely the perfect size.
I also test mounted with both Kyosho and PN pins. Both fits fine without any polishing etc.

The total added weight on your car is only 2 grams. 1 gram if you have used the ATM brace before.
The mounting are really straight forward.

  • Cut off the stock mounting points with some wire cutters.
  • Unscrew the two screws on the top cover.
  • Testmount the new mounting points on the brace and to find out what side you want to face forward. One side gives 2 degrees of caster, and the other gives you 4 degrees. Here you can see it in 4 degree caster configuration. 
  • Push the top brace into its place. It fits perfectly in the holes, but gently force it all the way down.
  • If you need to raise your roll centre, this is where you do it. Add shims in the holes to adjust it.
  • Place the arms on the brace. Fasten them lightly with the supplied 3mm screws on the inner hole.
  • Insert the longer screws in the outer hole. Do not tighten all the way at this point.
  • The supplied tool are made for the upper arm pins. Use some stock ones or the ones you have and place them in the position you want. The 4 sides on the tool are marked with 0 , 1 , 2 and 3 holes. These tells you have much static camber you will have. 0 - 3 degrees.
  • Insert the tool into the new mounting points. Make sure the key hole in the middle are in the correct place.
  • Now you can tighten it down. Use tread-lock if you feel the need for it. 
Now you are set. Mount everything together and drive.

Use this mount together with the longer king pins from Reflex Racing. They are made for each other.


The adjustable camber is nice. You can use the stock plastic arms ( they are the lightest available now) Feel free to cut of the inner pivot. Reflex are also coming out with there own arms. Hopefully these will be even lighter than the cut down stock ones.
Unsprung weight is something you really should focus on minimizing. The more unsprung weight, the slower suspension movement you get.

The caster settings are one of the strongpoints of this front end. You get maximum 4 degrees of caster, but this really! helps dialing your car in. 
You get a much more stable, straight tracking car with more caster. You get away with more toe out if you add caster. The gravity will always try to straighten the wheels. You can say that caster adds self centering to your front end.
You also get added camber gain.

The camber adjustment are really solid. I have not needed any tread-lock to fasten them good enough.

On track this front end really rocks. The adjustments you can do on it really helps you dialing in your car for every track conditions. 
Just try it and you want be disappointed!


21.7.10

Review. Reflex Racing Spur Gear v2

Also see the article on the ultimate differential. 5.0 grams total weight!

As stated before: Reducing rotating mass is critical in extracting performance from your Mini-Z. You will get an increase in response. Acceleration and deceleration is increased, and your batteries will last longer.

Reflex Racing always focus on the right stuff, and came out with a lightweight spur gear earlier on. See review here. The Reflex Racing 64 pitch machined Delrin Spur gear.


Now they have made a spur gear that is even lighter than the previous version. The V2!

It is a lot lighter than any other spur out there. It is also very durable since it is made from delrin. 
You can choose to run with a bearing, or with the provided spacer. I always focus on reducing weight, so I opted for the spacer. With a bearing you can save some maintenance but at the cost of added weight.

The spur is a lot thinner than other spurs. This helps with friction as well.
Adjusting the diff tension with this gear is for some reason very sensitive. You have to adjust in very small increments, but by doing so you can achieve a perfect diff action. 

It has space for 6 balls, witch also is a good thing, since 10 balls are to much, and 5 is sometimes to little. On our high grip track 10 balls are never necessary, and just adds weight to your drive train. 5 balls can be to little, and gives excessive slipping.

Since RR supplies this spur with two different spacers you will always find the correct spacing. One is fitted for almost all combos, and the other is quite thick so you can grind it down to match every combo out there.
Supplied in the kit are one 2mm spacer, and one 3,3mm spacer.

I mounted this with a PN alu diff shaft, and QteQ diff parts. 

Compared to the old spur, this weighs 0,2 grams less. This sounds like very little, but I promise you. This will be noticed!
The accelleration and decelleration is improved!

You also get an ultra responsive car, since your throttle input are instant. You get a lot better feel for your car.

Combine this with PN Racing Ultra light alu diff shaft, and QteQ diff parts, you get the ultimate differential. This is actually lighter than the stock plastic diff!!!!!

5.0 grams! You cant beat that with any other combo!


17.6.10

Review. Eagle Racing Setup board & Ride height gauge

Eagle Racing has been coming out with a lot of parts lately, and I was eager to look at some of their products.

The first thing I wanted a look at is the setup tools they recently released.

Setup board.
The kit comes nicely boxed in a solid box with bubble wrap around. No damage in shipping should occur.

The three pegs provided is for adjusting it level on the work table. In the center it is a bubble leveler that looks to be quite accurate.
They are spring loaded, so that they will keep in position when you handle the board.

It looks solid and the print on the surface are of great quality. It seems to be resistant to oil and grease, and should provide everything you need.
The print is very visible. Black against light grey.

The track measuremts are in 1mm increments. Centre to max with is 0 - 130mm. This is where you also measure the wheel offsets.

Wheel base measurements are in these increments. 86, 90, 94, 98, 102, 106mm.

The surface are completely flat, and should provide the optimum surface for setup work.

Ride height gauges.
There are two gauges included in the kit.
one stepped gauge used with a couple of 3mm spacers, and one straight one for using when the car is in resting position on the work bench or your setup board.

When I control measure them, they are very accurate.
The stepped gauge are in increments of 0,5 mm. Range from - 2,5mm to + 2,5mm. This is used together with two pcs 3mm spacers that you place your car on when measuring.

The gauge without steps are for when the car sits down on the surface. Here you have increments in 0,1mm. Markings on the side and on top of the gauge.

A setup board are not that much needed, but gives you an accurate base for working the setup on your car. The printed measurements are a nice touch, and will be helpful in those heated moments at the track when you are rushing a setup.

The gauges are also in the category "nice to have". They will help you when you are logging your setup, and also makes it easy for you to measure the ride height etc on the fly.

If you are in the market for a setup board and ride height gauges, I would definitely consider Eagle Racing's version.
They are cheap, and has great quality.

13.5.10

Review. Atomic oil filled shock


The first spy pics of this shock was seen for over one year ago, and now Atomic finally has released them.

The packaging is really nice. The shock, oil, and the rest of the parts has their own compartment in the packaging.

They also have provided a user manual and parts list.

First look inside the package revealed that the oil bottle had leaked out all of the content. The foam packaging and the user manual were completely soaked.

The kit comes with two springs. One black and one silver. No description on witch of them were hard or soft. I measured them on my spring measuring device, and found that the Black Spring were the softest one, altough they differ very little.
They are much stiffer than for example the springs for the Kyosho oil filled shock. This worried me a bit. More on that later.

It comes with two different chassis mounts. A nice feature. I ended up using a PN shock mount on my setup.

Since the oil bottle were empty on arrival, I had to use another oil. I decided to fill it up with my favourite for the kyosho oil shock. This is Kyosho 500WT silicone oil.

Disassembling it is very easy, and filling it with oil also. I waited a good hour to get all the air out of the oil. Mounted the cap back on, and wow. This feels good!

Installing the damper on a conventional disc damper equipped car is straight forward. However I mounted it on a PN Tri damper setup, so I had to come up with some solutions to make it fit good.

It is very long compared to the Kyosho shock. When mounted on a PN TDS fitted car this makes the space left for the transponder very little.

When i finally got around mounting it, the feel of it is extremely smooth. The dampening it provide is superb. I really like this one.
The spring hardness worried me a bit, since they are very hard compared to the Kyosho oil shock springs. But to my surprise, this was not a problem at all. The springs are quite progressive, and the small shock travel these cars actually use, the hardness were near perfect for me with 0 preload.


The first track test proved its a real good shock. Both the adjustability it gives, and the dampening it provides is superb.

It is a bit heavier than the old Kyosho oil shock, but since it adds a lot of adjustablity it can be worth the extra 1,4 gram.
It weighs in at 2,8 grams filled up.
The kyosho schok weighs 1,4 grams filled up.

This gets my recomendation. A really good product.


Onboard kamera med Rune

Treningskveld

Formula 1 news

MOTOGP news

WRC news

Search This Blog